Review: Revlon Precision Lash Adhesive

Saturday, March 31, 2012

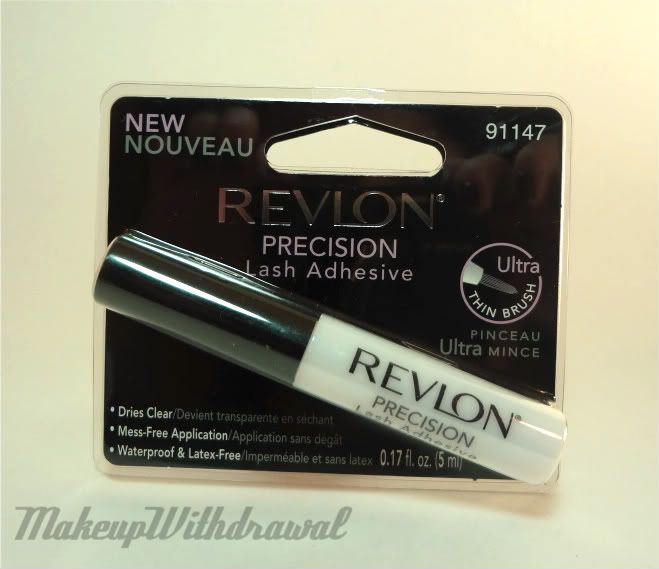
My little tube of DUO lash adhesive was getting old so I figured that it was time to buy new lash glue. I wanted to try something different this time, and this new Revlon Precision Lash Adhesive caught me eye.


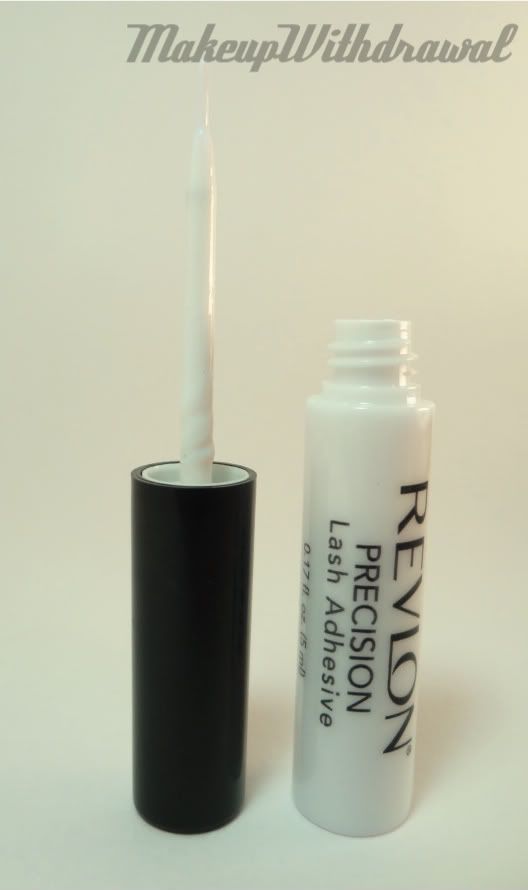
I liked that it came in a tube with a little brush. It's dead useful for carefully painting the glue onto the false lashes, and for getting glue where you really want it. Also, it's pretty great for touch ups (not that I had to touch up, it lasted all day) since lash glue in a squeeze tube is really not convenient on the go. Not to mention, if you happen to be new to applying lashes, it makes putting the glue on a little less tricky.


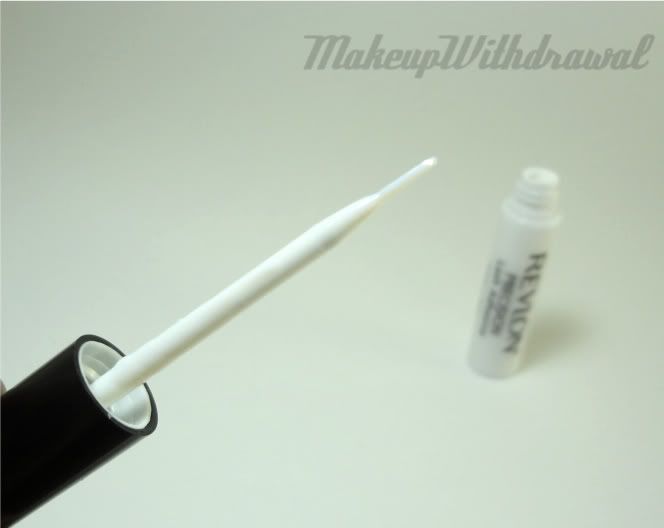
It's milky in color and appears blue against the black lashes. The watery consistency made it so that I didn't quite have enough on the false lash the first time I applied it, but the nice thing about the brush was that I could easily dot a bit more onto my lash line to help it stick. I like the consistency though and unlike DUO which you can sort of see if you apply to much, this Revlon Precision Lash Adhesive really dries invisible.

Here's a major selling point; it's latex free! This is great news for those with latex sensitivity.


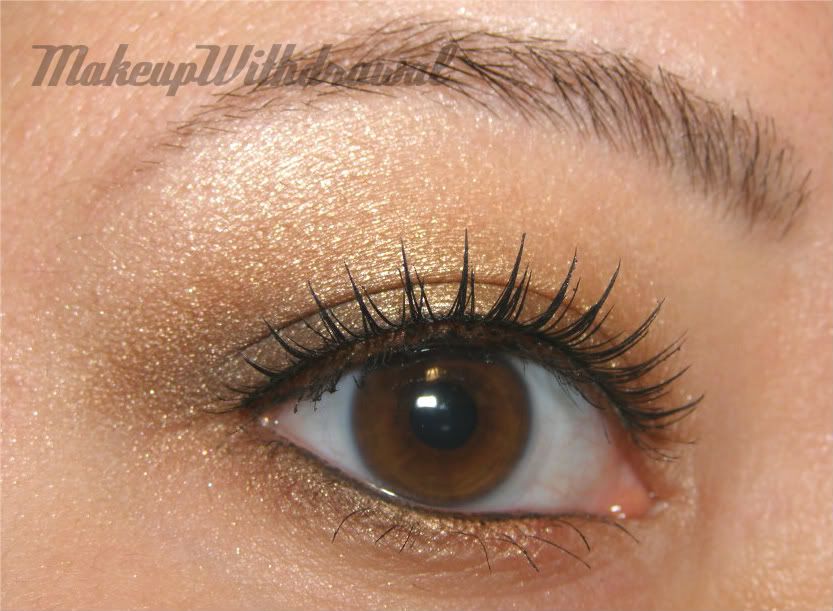
I'm very happy that I tried this new lash adhesive. I think it has a permanent spot in my makeup stash.  It was $4.99 at CVS last week during the BOGO50% Revlon sale and for some reason it didn't ring up as half off (I think because it's technically a tool and the sale was limited to cosmetics) but the cashier marked it down for me anyways.

If you wear false lashes, what glue do you use?


Products featured were purchased by me, for my own use. For additional information, please refer to my Disclosure Policy.

Zoya Surf Collection: Review and Swatches

Friday, March 30, 2012

The day before yesterday, I showed you the Beach collection (click here to see). Today, I have the more sparkly of the two, Zoya Surf. If you thought the cremes in Beach were very appealing, this might be more up your alley!

Surf contains six polishes with what Zoya describes as a 'foil-like finish'. 


Carly is an amazing saturated wine-purple and silver foil that is so glowy and shiny.


Meg is an apple green and silver foil. Out of all the polishes, this one showed a little bit of streaking. 


Myrta is a red-orange shade with golden shimmer. When I saw this shade, I immediately thought of Pantone's color of the year.


I don't know anyone named Kimber, but if that's your name, wow- you are so lucky to have such a gorgeous polish named after you! It's not really a foil, but a fuchsia-deep pink sheer base with lots of golden shimmer. 
Rory, a darker lavender pink with silvery foil. I think that this one will look great on a variety of skin tones.


Zuza is a saturated aquamarine shade with silvery foil. Very pretty, really stands out!

The formulas varied with this set of polishes. Though most of them were very opaque with just one coat, I found that two made for better leveling.  I thought that Rory, Myrta and Meg all needed a few drops of polish thinner to make them easier to apply, but that may just be my preference because I like thin coats. I have a feeling that Carly will be fantastic to stamp with, I'm excited to try that out. 

I really liked this entire set, even more so than the Beach set. Though Kimber is not a true foil it was unexpectedly my favorite shade, even though I'm not a pink girl! I also liked that unlike some other foils I own, which are overloaded on silvery bits and look very cool in tone (and sometimes not very flattering on me), Zoya used very vibrant colors (well, except for Carly) and only enough foil to make the shade very sparkly to view. My inner magpie is very happy. 

Zoya polishes are $8 each and can be found on Zoya.com


What do you think of this Surf set?

Products featured were sent to me for free, for review. For additional information, please refer to my Disclosure Policy.

Winner!

Thursday, March 29, 2012

Congrats to Josefin of Sweden for being the winner of the China Glaze Hunger Games polishes as determined by Random.org!

I had over 180 people enter with over 200 entries, so it took me a while to verify every entry. (I learned my lesson, I'm using some sort of giveaway widget next time.)


Thank you to all those that participated!

Zoya Beach Collection: Review and Swatches

Wednesday, March 28, 2012


I'm so excited to show you one half of Zoya's summer polish collection today! It was waiting for me when I got home from work and I couldn't wait to swatch them all. I took them outdoors with me just so that I could admire the bottles in the sun.
There are six shades, five of them are cremes and one has additional soft frosty shimmer. Without further ado, let's take a look at them.


Reagan, a raspberry magenta color. It is similar to Zoya Juicy, but lighter and more vibrant.


Lara is a bolder pink. Perhaps not as blue as this photo might suggest, it has a juicy quality on your nails that you wouldn't expect from the bottle!


Arizona is a medium orange shade. Perfect summer orange color, not too bright nor too dull.


Shelby, a pink creme that looks more vivid on my hands than how mild it appears in the bottle. I tried to color correct this shade, because it's a bit more intense in person... but I think it's still not quite right. It's more lively than you would guess!


Tracie is a soft pea green with a touch of shimmery silver frost. I like it, it was a pleasant surprised to see a little shimmer among all the cremes!


The last shade, Wednesday is one of my favorites. A light sea green, there's no better color to invoke strong desires to spend a day at the beach.


Even though there are three pinkish shades, they're not just lighter and darker shades of the same color. Pointer and ring finger are painted with Lara, pinky is Shelby and on my middle finger I used Reagan. I find Reagan is a bit berry, Lara has a bit more red.

The formula on all of these were fantastic, leveling really well. Tracie did seem a tad 'sticky' but it wasn't a hassle to apply or anything. Tracie, Shelby and Wednesday were three coaters for me, but all the rest were perfect in two. In fact, Reagan looks fantastic with one generous coat, but I did two because cameras see more than the eye can.

I really liked that all the colors are very clean for summer, not dull or dusty at all. Perfect for complimenting the long days spent outside in the sun, perhaps by a pool with a fruity drink in hand. Also, how neat is having a polish named Wednesday? **snaps fingers to the Addams Family theme song**

What do you think of these punchy summer shades? Will you be buying any of these Zoya polishes from Zoya.com ?

Stay tuned for the second half of the swatches, Zoya Surf in the next few days!


Products featured were sent to me for review. For additional information, please refer to my Disclosure Policy.

China Glaze Laser Lime

Tuesday, March 27, 2012
Let's revisit something from last year's China Glaze Tronica collection.

I like this polish a lot. It's Laser Lime and even though the holo effect isn't very strong, I still like colors and the sort of fine sparkle finish.


There's something about the almost dull-pastel quality to this color that I like. Beats me!

Have a great night.

Products featured were purchased by me, for my own use. For additional information, please refer to my Disclosure Policy.

Glitter Gal Sunday: Whiteout

Sunday, March 25, 2012
Happy Sunday!

Today's Glitter Gal is um... interesting. I can certainly say that I own nothing else like it.
Whiteout is a white with pink-orange opalescence (I'm not sure if I'd call this a true duochrome) and silver holographic glitter.

It's rather sheer, even with three coats on I can still see my nail line somewhat.

It reminds me of butter London Knackered in the sense that it has got some holo glitter thrown into a base that has color shift.  Honestly, it is not my cup of tea. I think I'd like it if it was just the white base with the coppery pink flash because I don't know off hand of anything quite like it, but with the addition of the glitter it is just too much.


What do you think? Up your alley or just visually offensive?

Product featured was sent to me as a prize for winning a contest. For additional information, please refer to my Disclosure Policy. 


Green (Eggs and) Spam

Saturday, March 24, 2012
I promise I'll be done tallying all the entries to the China Glaze Giveaway by tomorrow. There were so many!
One of the things that people commented on was that they'd love to see spam... so here's some green spam for you!
Note: I took these with the new camera and on my screen the background looks greenish. No idea why, working on fixing it! However, the color of the polish itself is accurate.


American Apparel Army Jacket. Light pea green creme.


Color Club Magic Elf, from a holiday set from a few years ago. Green base, with bluish tint with amazing gold shimmer. It's so bright, it almost looks like a foil. 


Zoya Shawn. An amazing green creme. One of my favorite Zoya shades ever.


Sinful Colors Call You Later over Zoya Shawn. Three coats, top coat hungry.


Orly Lucky Duck. Green creme with a tinge of blue.


Savvy Garland. One of those glowy shimmers. 


NYX Las Vegas. A green jelly with green flecks. It's so pretty, a close version to China Glaze's Emerald Sparkle. 


A shade from a Funky Fingers set. I own nothing else like this. It's a spring green/yellow-gold shimmer. So pretty!

Another all-time Zoya favorite, Veruschka. Looks amazing with a shiny top coat too.


Essie Pretty Edgy. Funny thing is, this IS edgy for Essie. But to me it's a very fun, happy color. 


Sally Hansen Jumpin' Jade. An impulse buy, I thought it might be great for stamping but have yet to test it out for that purpose. 


OPI Here Today...Aragon Tomorrow. A classic, almost black-green. It looks like a creme, but if you do one coat and study it closely you'll see that it's made out of small irregular particles that look like dull flecks. Odd! 


Last but not least, the two cute males in my life.

One of these two is my favorite, but which one?

Whew! I have so many greens in my collection. I could easily do a part two or even three!

Bleh. I am not happy with these pictures. 

Le Métier de Beauté Magic Luster Cream (and Why You Need This)

Friday, March 23, 2012

Magic Luster Cream is my first product from Le Métier de Beauté and I must say, what a great introduction to the brand!
This cream is a multipurpose product that can be used alone to add a bit of luster, or combined with powder products to make infinite combinations of eye tints, cream blushes and even lip color.
I heard about it about a while ago and while I was ordering on Nordstrom.com I figured I'd add it to my cart.... because I *need* another product to help me use up the things that I already have... right? Only a beauty junkie could understand that reasoning.

LMdB Magic Luster Cream comes in a matte black screw top jar (oh how I love matte black packaging!). The texture is a sort of thick, tacky gel rather than a true cream.
I quickly found a myriad of uses for this product. You can mix it with dry eye shadow (loose or pan form) to create various custom cream shadows (perfect for creating sleek runway eye looks). You can mix it with your powder blush to instantly make lip colors. I also mixed it with some shimmery pigments to make beautiful, glowing cream highlighter.
One interesting thin that  noticed about Luster Cream which makes it different than just mixing Vaseline with your makeup is that it still preserves the finish of the product. To better understand what I mean, take a look at the following picture.


As a blush, Rock & Republic All Nighter is on the matte side, with a bit of shimmer. See how it doesn't turn into a slick color like the rest, which had shimmery finishes? Fascinating. Plain petroleum jelly can't compete.

I also found that this cream worked fantastic as a way to enhance the longevity of blushes. I simply tap a little onto my cheeks (with my bare fingers, the heat helps melt it into my skin) and apply blush over it. Shades that previously lasted six or so hours now wear well into the night.

You could even wear it by itself. Even though my t-zone is oily, my cheeks are quite dry and I found that a touch of Magic Luster helped liven up my skin (does this appeal to anyone else with dull complexions? I
t should) and was very pleased that it didn't break out my skin. I'm guessing that this works because the only two ingredients are Hydronated Polyisobutene and Tocopheryl acetate (Vitamin E acetate) which are very common ingredients in cosmetics and skincare.

Keep in mind that with this product, less is more. You only need a tiny bit due to the slightly sticky texture. In fact, I'd recommend using as little as you can when wearing it on your eyes to prevent creasing. So though $24 does seem like a lot to shell out for a small jar of it, I've used it quite a bit without really putting a dent in my pot.
Another side note- keep in mind when mixing it with eye shadows that often times eye shadows include ingredients that are not lip safe (this is true especially for indie brands).

So have I convinced you yet? Surely you own a few eye shadows or blushes that you've thought on more than one occasion would make a gorgeous cheek shade or lip color!

Le Métier de Beauté Magic Luster Cream is $24 and is available at Bergdorf Goodman, Neiman Marcus and Nordstrom (may vary by location, your best bet is online).

What do you think? Do you have any multipurpose products such as Le Métier de Beauté Magic Luster Cream?

Products featured were purchased by me, for my own use. For additional information, please refer to my Disclosure Policy.

Tutorial: Sprinkled Nails

Wednesday, March 21, 2012

I had a few requests to explain how I did the nails in this post, Gold Dust on Blue. It's really easy, and I think it's a great wait to spice up a basic manicure, even if you say you're bad at stamping, nail art, have shaky hands, etc.


You'll need:

-Your base coat, top coat and nail polish color of choice.
-A straw, orange stick, etc (something thin that can pick up a bit of powder).
-A paper towel or surface you can easily clean.
-Optional: clear polish
-Loose powder, as many shades as you want. Now, this can be colored mica that you get from places like Coastal Scents or TKB Trading, or even loose eye shadows and pigments. The only thing about shadows is that sometimes I've found a few that sort of change color once you put a top coat on, so you might want to test it out on one nail before doing a full manicure.
In this tutorial, I'm using Apple and Blueberry Pop from TKB Trading (not sure if it is available any more) and Revlon Black Lingerie, as well as a simple birch wood stick and a clear polish.


Paint your nails with your base coat, and the first coats of color (if it's a two coater, do one and if it's a three coat color, do two).


Working one nail at a time, paint your nails with the colored polish. Immediately, take your stick and scoop out a bit of your powder and shake it above your nail. You can blow the powder lightly to create a fine dusting of powder, or drop larger clumps for bigger dust splatters on the nail. It's up to you.


It can get a bit messy, which is why I suggest putting down the paper towel first. Complete the other nine nails and wait about a minute for the polish to dry a bit (you don't have to wait for them to dry completely, once they become some what tacky in texture, miscellaneous powder won't easily stick to it by accident). Now, rinse your nails with water taking care to not bump your polish. The water just rinses off your excess powder so that you can apply top coat without picking up the powder back into your bottle of top coat.

At this point, if you only want one color of dust, you can stop here. Wait for the water to dry off your nails completely and then add top coat. If you'd like to add another color, simply repeat the first few steps using a clear polish to adhere the powder instead of your colored polish. Here, I repeated the process with the green mica.

Final result:


See? Wasn't that easy?
I like how I will get different results every time. Also, as someone who has a lot of loose eye shadows that I will probably never use up, it gives me endless options to use those lovely colors.

Hope someone finds this tutorial useful! If you try out this technique, I would love to see the result!

More Lashes From KKCenterHK

Tuesday, March 20, 2012

I was given the opportunity to try out more lashes from KKCenterHK. 
These are ES brand, called A880. I liked that they're a bit spiky, but still quite natural looking.


The band wasn't as flexible as some of the others that I've tried from KKCenterHK, but still fit reasonably well. I like that the band isn't super noticeable, it's quite subtle and doesn't scream "Fake! Fake lashes!"

As you can see, the lashes are longest in the center and decrease into shorter lengths at the ends.

They're $8 for 10 pairs which is a fantastic value if you wear false lashes often, but does not include glue. Heck, I don't even know where in the US you can get lashes for that price.

Here's what they look like on my eyes.


On a side note, I want to mention that I have made a purchase from KKCenterHK before, with my own funds. My order arrived very quickly considering that the company is overseas.

I'm also wearing:

Brows: NYX Brow Shaper, NARS Bali shadow
Eyes: LORAC Behind The Scenes Eye Primer, MAC Copperplate, Rock & Republic Veil, Rock & Republic Chain Link, MAC Prepped For Glamour, Femme Couture Cake Liner, La Femme Eye Liner Sealer
Lips: Stila Convertible color in Peony
Face: MUFE HD foundation, Chanel Rose Temptation, BECCA Fine Loose Powder

Do you wear false lashes often? Or at all? What style do you like, flamboyant, feathered, natural, etc?

Product featured was sent to me for review. For additional information, please refer to my Disclosure Policy.