Tutorial: Magenta Winged Look
Thursday, February 4, 2010
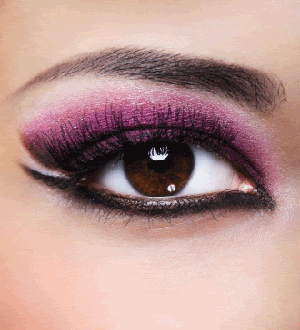
A fellow member of MUA asked me to break down this look- so I gave it my best shot. It's actually pretty simple, the most difficult part of this is creating that cut look on the side, and the blending to create that beautiful gradient.
 List of items used: 1 large fluffy eyeshadow brush. 1 small eyeshadow brush, 1 smudger brush, 1 blending brush, 1 eyeliner brush, a pair of scissors, a Post-it note, Wet'n'Wild Arch Envy, e.l.f. cream liner in black, eyelash curler, black eyeliner and 4 colors of eyeshadow- a pearly white, a bright hot pink (can be with or without shimmer), a shimmery violet (super pigmented) and a charcoal black (with or without shimmer).
 The first thing I did was to cut out a crescent piece out from the sticky part of the Post-it note- that's going to be the stencil for my look and placed it on the edge of my eyebrow with the other end close to the edge of my eye. It's the key to getting that really clear cut edge on the outer lid (See picture for detail). I applied the tiniest bit of Urban Decay Primer Potion all over my lids (and a little under them too). Next- I swiped that frosty pearl white with the largest brush all way from my eyebrows down to the lashes, even under my eye and in the inner corner as well. The next step is to apply the pink. It's important to use very pigmented colors- or else I find that you lose the essence of the color when you blend the shadows together. Here I'm applying the pink to most of my eye (small eyeshadow brush), and from the lashes to the middle of the lid, just above the crease and out as far as the end of my eyebrow. Gently blend the pink into the white at the brow bone area.
 Now, I'm going to add the next color- that purple. I choose a violet that was on the pinker side of the spectrum. If you were to use a burgundy (that's more red) or an indigo (more blue) then it wouldn't melt into the pink color as effortlessly. So, clean off your small eyeshadow brush and apply that violet to the bottom third of the eye (from the lashes right up to the crease). With your blending brush, use small strokes to blend it into the pink. Then, I edged my upper and lower lash lines with that dark charcoal black with the smudger brush. Depending on how pigmented your purple is- you might have to add another layer of violet on top of the black to really make that color pop out. Between each color application though- blend, blend, blend.
 Now, peel off the Post-it. You should have a flawless edge therel (if not, no problem- clean it up with a Q-tip and make up remover)
Here's my favorite step: adding that cream eyeliner. The smaller the brush, the more precise you can get it. Starting at your inner tear duct, draw a 'V' like so:

Line the rest of the upper eye lid, stopping at the edge of the eye. On the lower lid, line the waterline all the way pass the edge, but bring it past the edge of the eye- extend the line half an inch past. There should be a space between that extended line and the upper lid, like so-
All that's left after this is to go over the cream liner with black pencil (this will soften the line a bit so it isn't quite so harsh and make the look really last) or you can even stop at this step. Curl your lashes and apply a lengthening mascara and it's all done!
Tips: Make sure you start out with clean brushes. Dirty brushes will contaminate your beautiful colors. Also keep Q-tips handy for clean up and don't be afraid to keep practicing this look- if your hands are steady it might take a few attempts to get it right.


No comments:
Post a Comment
So, what do you think?
Please be respectful and do not spam links. If you'd like to link back to your own site, please use the feature in Disqus that allows you to do so.
Thanks!