Stamped: Zoya Savita With Daisy Fuh-Glee

Monday, April 30, 2012

Last weekend, I went on a little adventure. I had emailed LeChat to find out where Dare To Wear polishes were sold in my area, and on Sunday a friend and I set off to find this mysterious local beauty supply. It wasn't exactly in the best part of town... but it was an amazing little dusty! Today's manicure features Zoya Savita as the base and I stamped it with a polish that I found from this little beauty supply.


It's from Daisy Nail Lacquer. I'd never heard of this brand, but the polish was very cheap, $1.85 or something like that. It was actually Big 3 Free, much to my amazement. I bought it because it was a nice lavender foil, and because of the name.

Fuh-glee. I'm not making this up, I swear.

Anyways, Fuh-glee stamped very nicely with BM plates 205 and 210.

Products featured were purchased by me, for my own use. For additional information, please refer to my Disclosure Policy. 

Guerlain Emilio Pucci Météorites Perles D’azur Illuminating Powder

Sunday, April 29, 2012

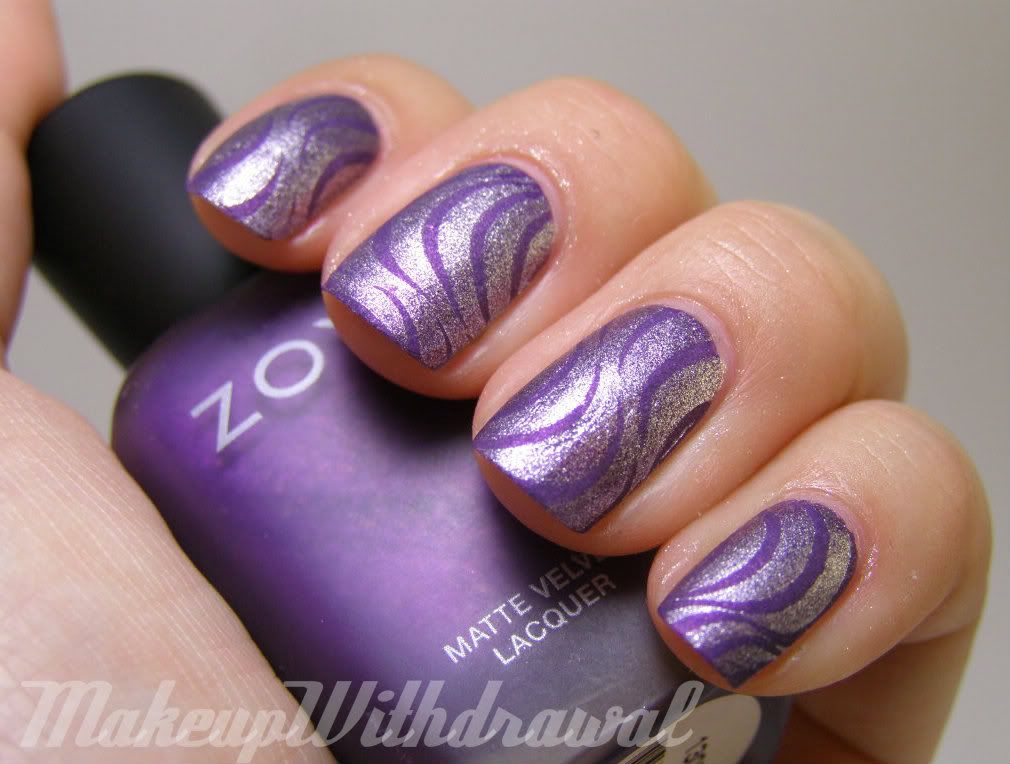
I need to get something out of my system. Ballz. Ballz ballz. Blue ballz. Balllllllz. Ballz!
Ok, done. Now I can go about this post in a much more mature manner.

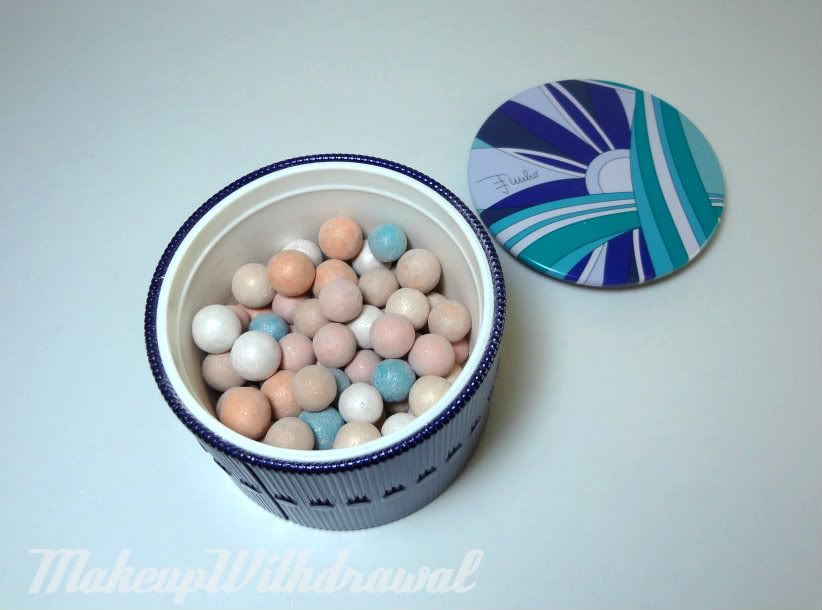
I finally did it. I went and ordered my first Guerlain product, the widely loved Météorites. For years now, (literally!) I've told myself that one day I would own these little pearls of face powder and see what the fuss was about. What better time than now, with the new summer collection collaborated by Emilio Pucci?

First, let's take a look at that packaging. Gorgeous Pucci "Winter Capri" print adorns the inside of the box and the lid of the sturdy tin housing the pearls. From what I understand, past Météorites were contained in little cardboard pots, but Guerlain revamped both the packaging and the actual product last year.


Inside, six shades of little Météorites that are lightly scented. I actually counted them and sorted them, for curiosity's sake.

Total: 63 balls.
7 Blue
10 Ivory
11 White Gold
11 Beige
8 Orange
16 Rose Pink

Before you think that there's an imbalance of colors, I'd like to point out that the blue and orange perles are quite a bit more pigmented than the others, so this ratio is actually ideal. Too much blue and you end up with a funny grey cast to your skin. I swirl a large fluffy brush over the pearls and lightly dust over my skin, creating a nice brightening and softening effect.
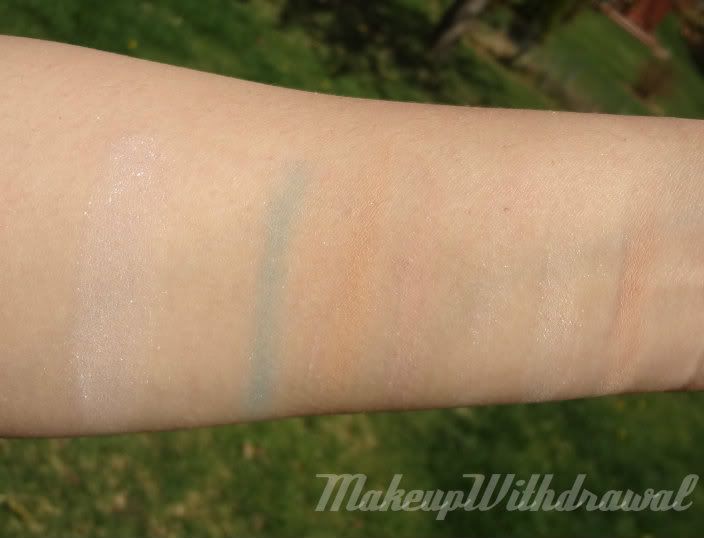
Left, all the colors swirled together and swatched heavily so that they would show up.
Right- each shade individually.
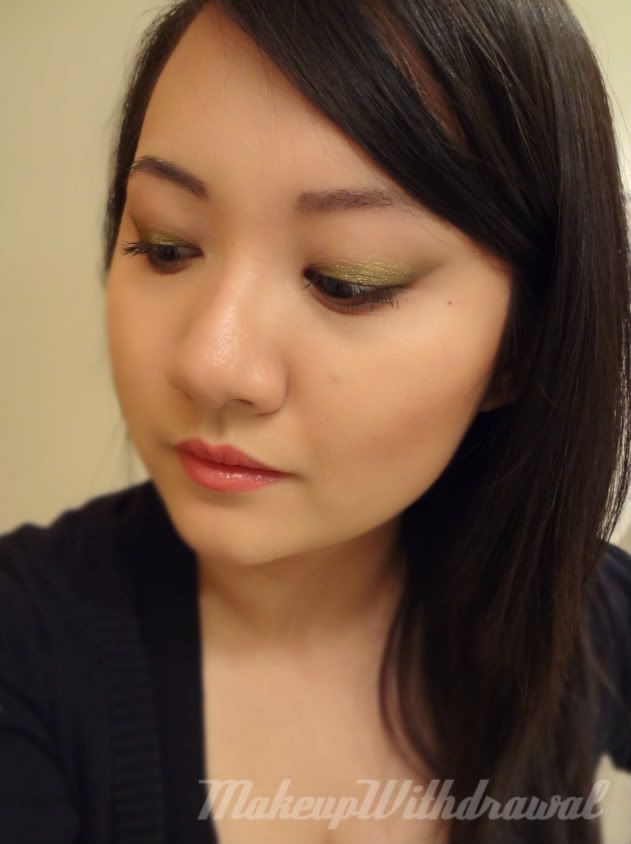
While this powder is sparkly, unless you're peering at my face from a distance of four or five inches away (please don't, take a step back!), the sparkle particles are not noticeable. Out in the bright sun however, there is a bit of wimpy-vampire sparkle.

What I liked about this powder compared to other powders that I've used, is that it doesn't make my dry cheeks look patchy yet surprisingly, controls my oily t-zone quite well. I'm fairly amazed, actually. While wearing these perles, I don't really blot my skin any more which is a considerable feat since I usually blot three times a day at least. At most, I have to blot once at around five in the evening or retouch my foundation around then.

Now, are these little balls of powder worth $59? I can't decide that for you. I bought these Pucci Météorites for myself because long ago I promised myself that I would own beauty products that not only added to one's appearance, but were beautiful to behold. In that aspect, Guerlain definitely delivered.

What do you think? Beautiful? Overrated?

Product featured was purchased by me, for my own use. For additional information, please refer to my Disclosure Policy. 

Reader's Pick- Holo Spam

Saturday, April 28, 2012
Good evening! The results of the last spam poll are in. 48% of you wanted to see holo spam, and luckily for you... I have lots of holo polishes! So this here will be volume one, with more to follow!


Nubar Reclaim. I only own a handful of Nubar polishes, but this is definitely a must have. A true green linear holo.


Petites Black Diamond. One of the few drugstore holos out there. This one is a dark charcoal, with not very strong holo. Still, a nice polish to wear. Petites don't get much love, I think it's the price and the small bottle size.


Golden Rose #107 Holographic Color. A rather obscure brand and polish. Golden Rose makes these very unique holo colors and this is no exception. Unlike other silver holos, this one has a sort of  blue smokey base. It is quite sheer though, but very dainty looking.


Milani Digital. Large particle, scattered pink holo. Very pretty, one of my first holos!


China Glaze 2NITE. A very linear holo that is somewhere between periwinkle and cornflower blue. Gorgeous to behold, not not at all forgiving of ridges and other nail imperfections.


OPI DS Extravagance. One of my favorite colors ever. It reminds me of A-England Saint George in the sense that it is very rich, but there's not very much holo effect. Large particles.


Sally Hansen Nail Prisms Pink Rose Diamond. I think this polish is more holo than they look in these pictures. A lavender tinged dark pink, with a little bit of opalescence.


Color Club Wild At Heart. Let's end on my favorite holo, shall we? This is also re-bottled as Funky Fingers Jester. A jewel of a linear holo that has a matte formula.

Thanks for checking out this first volume of holo spam!


Products featured were purchased by me, for my own use. For additional information, please refer to my Disclosure Policy. 

Feather Nails

Friday, April 27, 2012

I saw these nails on Fab Fatale that were dripping with awesomesauce. So of course, I had to try them out myself!

My first attempt when so-so. I wish there was an easier way to clip the feathers closest to my cuticles so that they look a bit neater. I bet these would be fun for a night out, but the way I use my fingernails... they wouldn't last much longer than that.

I used pheasant feathers I found at Micheal's for around $3 and Color Club Soft As Cashmere. Next time, I think I'll use less muted colors to make the feathers look less earthy and natural.

What do you think? Wicked awesome or it looks like I got into a fight with some fowl and a bottle of glue?

Stamped: China Glaze Dress Me Up + Sally Hansen Metallic Momentum

Thursday, April 26, 2012

Yesterday, a friend and I had a stamping party. I was showing her the basics, and while I was there I stamped this manicure up. 

The base is China Glaze Dress Me Up- a dusty, almost peachy rose pink. I used my beloved Sally Hansen Metallic Momentum on top, with XL Plate C. I'm absolutely in love with this plate, it was completely worth the $23 that it cost!

Have a great night!

Revlon Lip Butter in Candy Apple + FOTD & My Love of Memes

Wednesday, April 25, 2012

I know. I'm the last person alive to finally try one of the not-so-new-anymore Revlon Lip Butters.  I stayed away from them for the longest time because I kept thinking that they would be sheer, even though I saw dozens if not hundreds of pictures from other bloggers that proved otherwise.
About three weeks ago, I picked up a Lip Butter in Candy Apple (red... is anyone surprised?) and I'm quite happy that I finally purchased one.

Let me rattle off a few things I like-
-beautiful red color
-virtually unscented
-nice practical yet not ugly packaging with a cap that matches the color of the product
-slick and smooth formula, not drying (as one would expect for a product called 'Lip Butter'!)
-buildable color

What about things I don't like?
-Er, nothing. There's nothing I can think of!

I like to wear it lightly for a slight tint to my lips but can apply more for a truly saturated color. In the above swatch, I swatched it very lightly but in the FOTD picture below, I applied it more intensely. It's great that they're highly affordable, at around $7ish each. Take into account frequent drugstore sales, and you can easily grab yourself several shades.


Brows: NARS Bali shadow
Eyes: LORAC Behind The Scenes Eye Primer, LORAC Snake Charmer Palette, La Femme Eye Liner Sealer, Rock & Republic Fatalistic, false lashes
Face: LORAC Hypnotizing Peach blush (from Snake Charmer Palette), MUFE HD Foundation mixed with Giorgio Armani Luminous Silk Foundation, Guerlain Perles D'Azur Meteorites, MUFE Full Cover Concealer
Lips: Revlon Lip Butter in Candy Apple

Last but not least....


I used to post almost daily, but the past few weeks I've been slacking a bit. You know, the usual- school, work... plus Morgan and I started playing World of Warcraft again. Anyways, I'll try to remember to write more posts ahead of time so that there is fewer gaps between posts.

Have a great night!

Product featured was purchased by me, for my own use. For additional information, please refer to my Disclosure Policy. 

Tutorial: Easy Sponge Gradient

Sunday, April 22, 2012
Happy Sunday!

Today, I wanted to show you guys how I did the Tropical Gradient from earlier this week. It's very easy and I like that it has that seamless look.


You'll need:
-two or more polishes. Here, I've used Zoya Sooki and Zoya Arizona*
-disposable cosmetic sponge wedges
-nail polish remover and qtips for clean up


Start out by painting your nails with your base coat and your base color. Using the lighter of the two colors seems to work better for me.

You might want to cut the sponges down to size, to make it easier to use. Simply paint two strips of color onto the flat surface of the sponge, that touch slightly.

Bounce the sponge against your nail. It starts out looking patchy, but keep bouncing and you'll see that the colors start to blend.


When you're finished, apply your top coat and carefully clean up the skin around the nail with your polish remover and qtips. Voila!

A few tips:
-Creme finishes seem to work the best. If you use a polish with glitter or sparkle, the base color tends to be absorbed by the sponge and you'll end up with just the glitter/sparkle pieces on the nail.
-Wait until your base color is quite dry, or you might end up smudging it!
- Nail polish will disintegrate the sponge. Work quickly, and change new sponges often or else that you might find little bits of sponge start to come loose and stick to your polish.
-Try painting diagonally or using more than two colors, there's no limit.

Here's a diagonal manicure that I did with Zoya Wednesday* and Zoya Tracie*:


Was that simple or what? I think it's a huge improvement, from the first sponging gradients I did (like last year's Jen Kao/CND look I attempted).

Thanks for checking out this tutorial!

*indicates a product that was sent to me for review. For additional information, please refer to my Disclosure Policy. 

Pucci Inspired Water Marble

Thursday, April 19, 2012

I'm really excited for my first ever Guerlain product to arrive... so excited that I thought I'd base today's manicure off of the beautiful print that adorns the packaging of the summer Guerlain collection. I beg you to please ignore the cuts on my hands, and the bits of polish still left on my cuticles. Cleaning up after a water marble is kind of a pain.  
image from Sephora

I read on Temptalia that this print is actually called "Winter Capri", funny for a summer collection!

I used: a white franken I made, Wet'n'Wild Clear, Color Club Wild Child, Sally Hansen Mint Sorbet, American Apparel Imperial Purple, Sally Hansen Thinking of Blue and Zoya Wednesday*.


Did anyone else order anything from this collection?

Have a great night!

*indicates a product that was sent to me for review. For additional information, please refer to my Disclosure Policy. 

A Tropical Gradient

Wednesday, April 18, 2012

I wanted to do a gradient as soon as I saw the bright summery shades from Zoya Beach & Surf, so that's what I put on my nails today. 

I used Lara and Arizona and sponged them onto my nails. Now all I need is a silly drink with a mini umbrella and a cabana to lie under!


Products featured were sent to me for review. For additional information, please refer to my Disclosure Policy. 

FOTD & EOTD: A Little Bit of Burnished Gold

Tuesday, April 17, 2012
Hello, everyone!

My posting has been a little less frequent this last week. I was quite busy, spent a weekend doing things I hadn't done in a long time, and trying out some new things as well!
I went rock wall climbing, canoeing and hiking out in the woods in Sandstone, MN. I also got to try a high ropes obstacle course for the first time, which was really exciting. I did not realize how terrified I was of heights...until I was up in the air.
I forgot to take pictures, but this is what it looks like! image credit
Luckily, I thought ahead and filed my nails down quite a bit so I didn't actually experience any breakage. I don't know what is more amazing, the fact that I thought ahead or the fact that my nails were not utterly destroyed.

Now, here's what I put on my nails just today. It's a color that I picked up from Forever 21 just last week before my trip. 

It's called Love & Beauty Safari/Gold. I've always been highly amused by Love & Beauty's simplified names for all the polishes. It is gold shimmer in a smokey translucent base, that ends up looking like a burnished gold. I love how the smokey aspect makes it look olive. This is what I had hoped China Glaze Agro was going to look like. 

Coincidentally, I used the same colors for my makeup. I did a sort of winged shadow look. 


Brows: NARS Bali shadow
Eyes: LORAC Behind The Scenes Eye Primer, Shiro Cosmetics Star Crossed, Shiro Cosmetics Remake, Kiss Me Heroine Make Volume + Curl
Face: MUFE Full Cover Concealer, MUFE HD Foundation mixed Giorgio Armani Luminous Silk Foundation, NARS Douceur blush, Dot Dot Cosmetics Crystal Light Loose Powder
Lips: Rimmel Adorable Lipstick

Have a great night!

Products featured were purchased by me, for my own use. For additional information, please refer to my Disclosure Policy.

Glitter Gal Sunday: Bronzed Aussie

Sunday, April 15, 2012
*This is a scheduled post. I'm away for the weekend, but I'll be sure to try to answer your questions or comments as soon as I get back!*

Happy Sunday!

Today's Glitter Gal polish is called Bronzed Aussie. It's a warm, lighter bronze metallic with holographic chunks. When I first saw this polish, I was a little apprehensive. I just didn't know if that was a good combination or if it would look good on me.

It's so glowy and warm, I surprisingly like this one. It's very easy to wear and I was pleasantly proven wrong! There are some streak marks, as you can see from the photos. However, I think the holo bits help disguise them. I've worn three coats in these pictures.

What do you think of this color and finish?

Product featured was sent to me for free, as a prize for winning a contest. For additional information, please refer to my Disclosure Policy.