The Penguin Makeup Challenge: Black & White

Tuesday, July 31, 2012


It's finally here! I'm delighted to take part in The Penguin Makeup Challenge along with many other fabulous bloggers. Today's challenge is using the classic black and white.

Since I haven't done any outlandish makeup looks lately, I felt like I wanted to do something a bit more editorial than a day to day look. I was heavily influenced by the the makeup MAC did for The Blonds NYFW 2011. Even that was too safe though, I added in a bit more! I didn't want to over power it with false lashes though. Minimally outlandish?

Brows: NARS Bali shadow
Face: MUFE Full Cover Concealer, MUFE HD mixed with Giorgio Armani Luminous Silk, e.l.f. HD Powder and NYX Taupe blush
Eyes: LORAC Behind The Scenes Eye Primer, NYX Jumbo Milk Pencil, Wet'n'Wild I <3 Matte Palette, Calvin Klein Night Dust shadow, MAC Mixing Medium Gel, Urban Decay Uzi shadow
Lips: BECCA Gisella 
I wanted to play with sharp lines, but soft rounded curves at the same time. Hence the huge hair bun, and the contouring of the cheeks. 


Check out the other bloggers that participated and their awesome black & white looks!

50 Words or Less Reviews, Vol. III: Samples

Monday, July 30, 2012

Time for another installment of 50 Words or Less Reviews! This time I'll feature things that I tried first as samples or minis and how they influenced me to buy the product (or in some cases, throw them away and vow to never waste my money).

1. Laura Mercier Eye Basics in Wheat. $24 for 0.18oz.
Wow. Didn't know a product could make my lids look weirdly peachy and patchy, eye shadow hard to blend, crease more easily and just generally make my eye makeup look pretty bad. But this product can. Toss!

2. First Aid Beauty Ultra Repair Cream. $28 for 6oz.
Perfume SA gave me a sample to increase longevity of perfume. I applied it on my neck, broke me out in huge cystic acne. As a hand and body cream, doesn't do much for me. Really prefer Aveeno Daily Moisturizing Lotion, much less costly for better results.

3. Clarisonic Gentle Hydro Cleanser. $25 for 6oz.
I was pleasantly surprised to how much I liked this when a sample came with my Mia brush. Non foaming, watery cream texture. Gently cleanses my face without stripping or leaving residue. Actually bought a full sized bottle!

4. CLEAN Skin Perfume. $69 for 2.14oz.
I've waxed poetic about this perfume before. My point is, a SA gave me a sample and I absolutely fell head over heels in love at first sniff. It took me less than three days (for both me and the BF) to decide that I absolutely needed this. Full bottle? Absolutely.

5. Laura Mercier Foundation Primer. $32 for 1.75oz.
I like that this primer feels like a lotion, but that makes me feel like I could simply use a light moisturizer and it'd work just as well. Not so great at oil control, but decent for beautiful foundation application. Kinda pricey, so insert 'meh' sound here.

I feel really fortunate that here in the United States we have Sephora stores that are more than happy to provide us with samples! Not only that, but with orders we get to chose even more samples. It's a great way to test something out without the commitment of paying full price for something you might not like/breaks you out/smells like wet dog on you without the hassle of having to return it. That being said, we're also pretty lucky that a lot of stores have such generous return policies!

Have you tried any of these five products? What samples have you used lately that convinced you that you needed that product/never would buy it?

Products featured were given to me as samples as a part of being a consumer or purchased by me for  my own use. For additional information, please refer to my Disclosure Policy. 

Internet Courtesy - Read if You Use Instagram or Pinterest!

screen image from pinterest, captured 7/30/12

Hey there, today's post isn't quite super beauty orientated. It more has to do with what I describe as 'internet courtesy' (or in some cases a lack thereof).

Instagram and Pinterest, not to mention numerous of other forms of social media are fantastic for bloggers. I mean it. Since joining Pinterest and seeing how my work can spread like wildfire (thank you guys so much for pinning and repinning my pictures! Truly, it's really helped get my blog out there), I can tell you first hand how this sort of social media sharing can be a blogger's best friend. Some of my posts have sky rocketed in views and responses, it's been phenomenal in reaching new readers. 

However, there is a flip side. I can't tell you how many times I've seen a gorgeous manicure and clicked on it on Pinterest hoping to see what polishes and materials were used, perhaps to find a tutorial or simply to find out whose fantastic work it is and instead found the dreadful dead link. Eeek! There's been a few times where I really want to recreate a look or had questions, but couldn't find out more. After all, whenever I re-create a manicure or take inspiration from someone else's work, I want to credit them and pay them the courtesy of linking back to their post. I can't tell you how uncomfortable how it makes me to only be able to say "inspired by something I found on Pinterest". 

So I beg you, please leave some sort of trail back to the original poster or content. Even if a link is unavailable, it'd be really great to have some sort information, even if it's the name of the blog or the author because usually with a bit of Googling, one can find the original bits. 

image from instagram.com
Now... regarding Instagram. Recently a few friends and other users have shown me accounts where the user has posted my pictures as their own. Yeah. Even with the blatant watermark that I have on all my pictures. Here's the thing- truly I do not care if other people want to share my images. But to try to pass it off as your own work, really bites. It tickled me in a weird way to see other users leaving comments like "Awesome!!! What colors did you use?!" hoping for an answer that the poster would not know because clearly there was a picture with a watermark that did not = the poster's username. It's also kind of funny because scrolling through these users' pictures I see that they lifted many, many bloggers' pictures- isn't the fact that they have 3549 pictures of different sort of hands proof that the content doesn't belong to them? I mean, you'd have to be some sort of strange stitched up human centipede creature to have light-medium skin with medium sized nail beds one day, dark skin with beautiful elongated almond nails the next and alabaster hands with expertly squared short nails the day after that. (Of course, if you are a human centipede creature with millions of hands, I applaud you for figuring out how to use a smartphone and paint all your numerous digits.) 

The gist of what I'm saying is that the very least (and I do mean LEAST) thing is to let your followers know that the content isn't yours (#notmine) but really, that's the minimal effort. In the wake of the Sinful fiasco (see what happens when you try to pass off bloggers' work as your own?), I think that the most honest and just thing to do is to take a few moments to properly credit and let others shine for their work. Most of the people who use both IG and Pinterest are very conscious of linking back and I salute them for doing good in the interwebz!

What do you think of online image theft? What do you consider to be right thing to do when posting others' content and pictures?

Maybelline Colorama Topcoat #45 Blazes of Blue

Sunday, July 29, 2012

Good evening! Today I want to show you a polish that I spent a long time searching for and finally bought it off of a blog sale earlier this year. Yeah, it's discontinued and very hard to find. I suck, sorry. I'm not taunting you, I swear.

Maybelline Colorama Blazes of Blue is a milky polish with translucent glitter suspended in it. The glitters shift from a bright blue to almost purple. Over black, the effect is stunning!
In the above picture, my skin looks funny but it accurately shows off how cool the glitter is.


I had to up the ante a little bit by layering it with another one of my favorite glitters- Rimmel Eccentricity. Wicked awesome, if I do say so myself. Wait. This one is discontinued. Double whammy, again I apologize!

What's your favorite polish that's been discontinued?

Products featured were purchased by me, for my own use. For additional information, please refer to my Disclosure Policy. 

New LE NARS New Wave Palette

Saturday, July 28, 2012

Usually when I get new makeup, I test it out and thoroughly play with it before writing about it. That's not the case today. I ran home and started to photograph and swatch this NARS palette, called New Wave as soon as got in the door. Due to the limited nature of this product, I thought I'd show you guys pictures and info about where to get it before they are all gone.


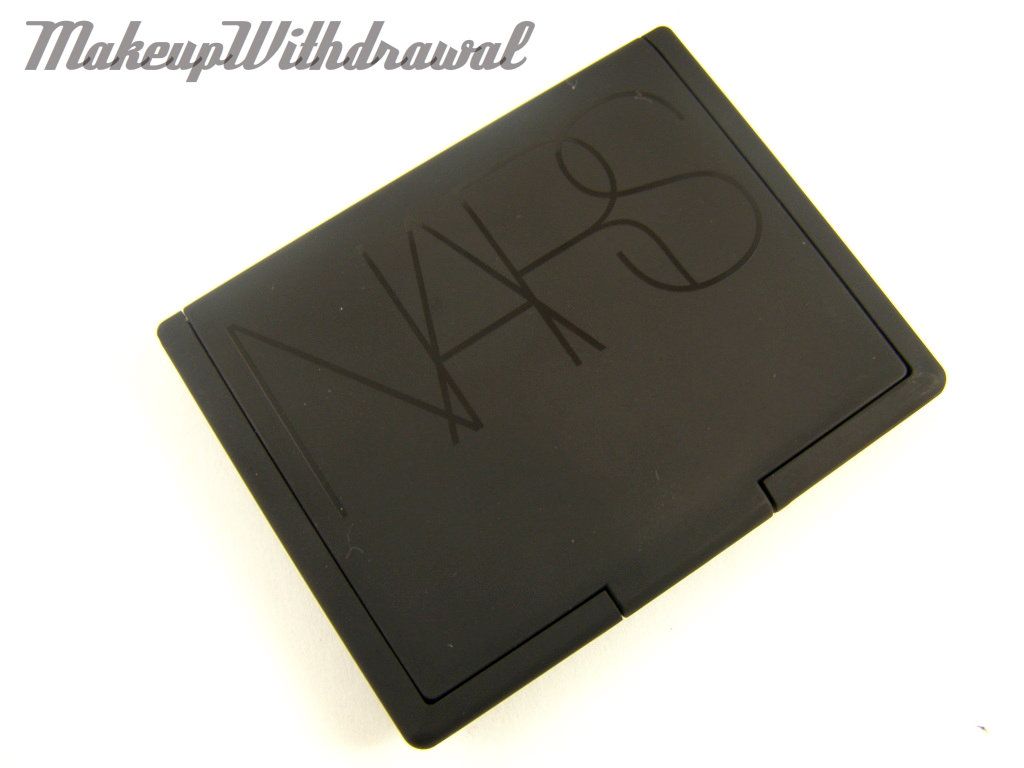
New Wave is one of two new palettes that are limited edition. The other palette is called American Dream. The shades in both palette are all permanent but like all NARS shadow palettes- you can't deny what exceptionally good deals they are, especially if you use NARS shadows a lot like I do but don't want to buy all the duos and colors individually. The packaging is different than my previous NARS palettes, with glossy 'NARS' embossed on the cover rather the traditional white lettering.

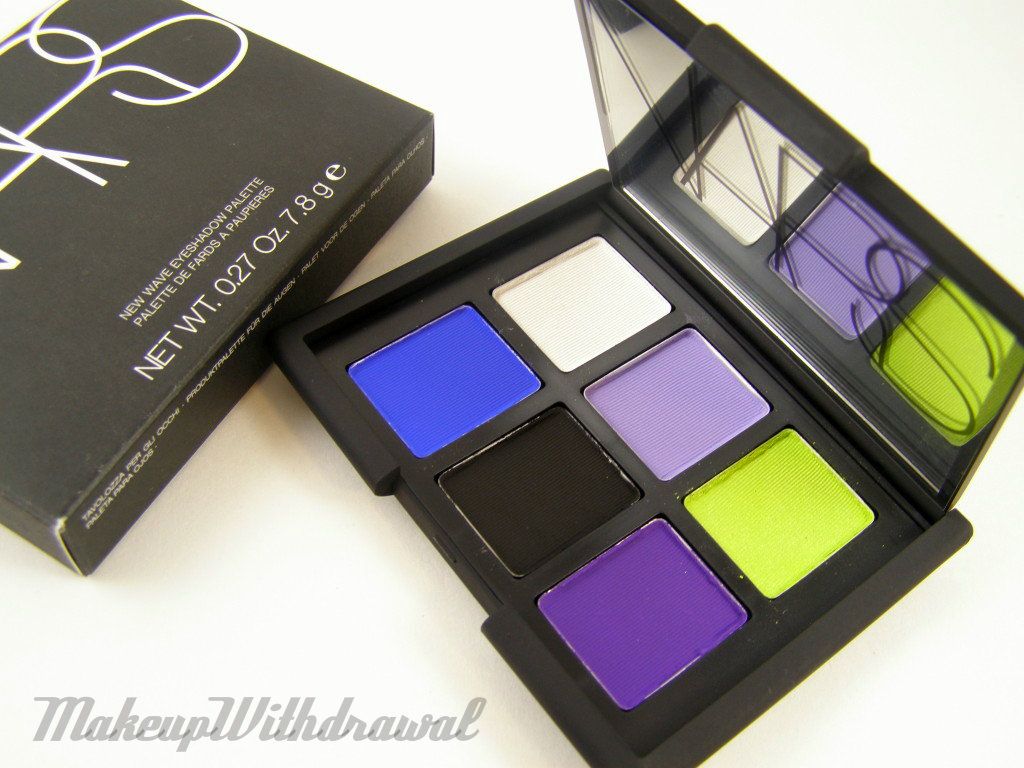
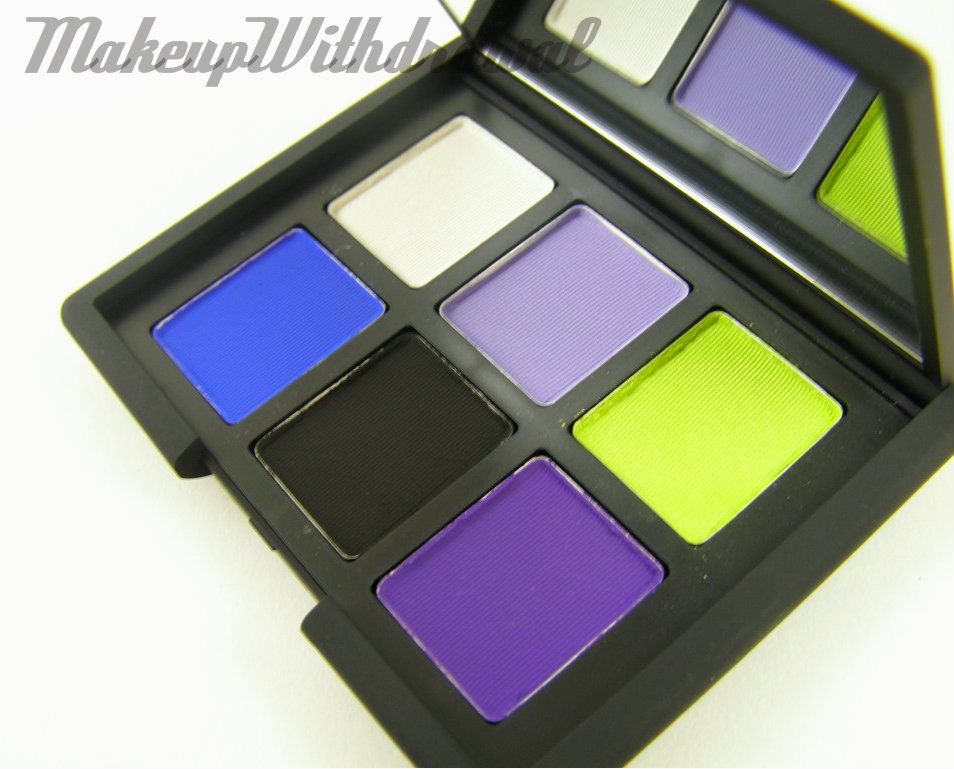
Let's jump right in. There are six shades, two that are shimmers and four mattes.


Top row: Pandora (II), Jolie Poupee (II), Rated R (II)
Bottom row: Outremer, Pandora (II), Daphne
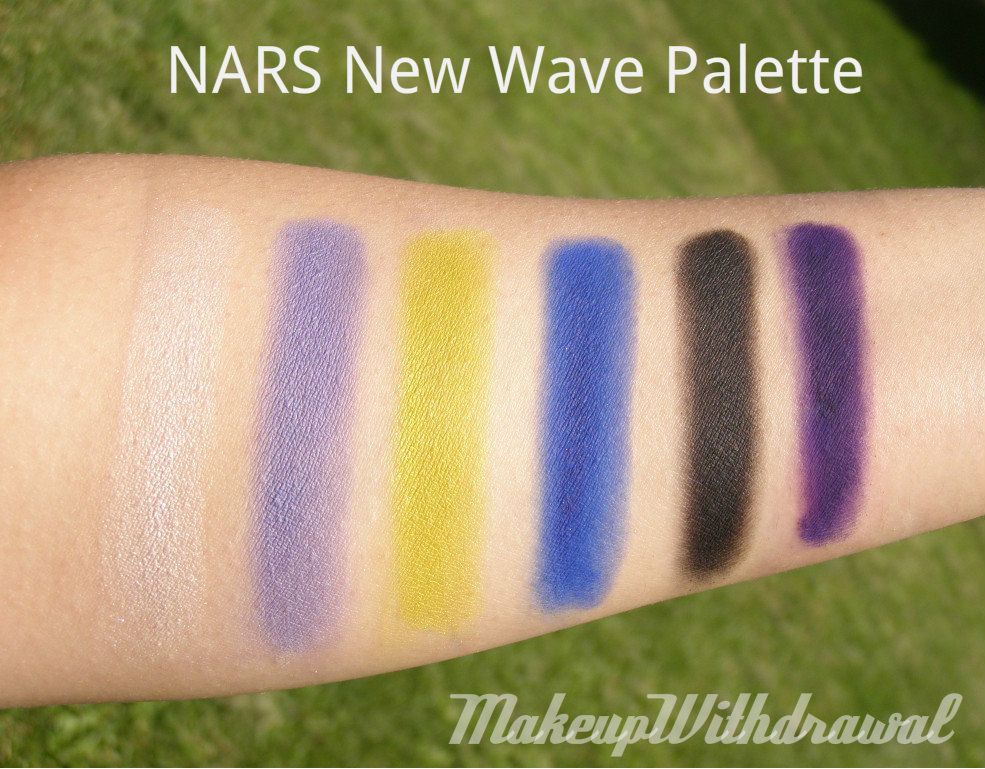
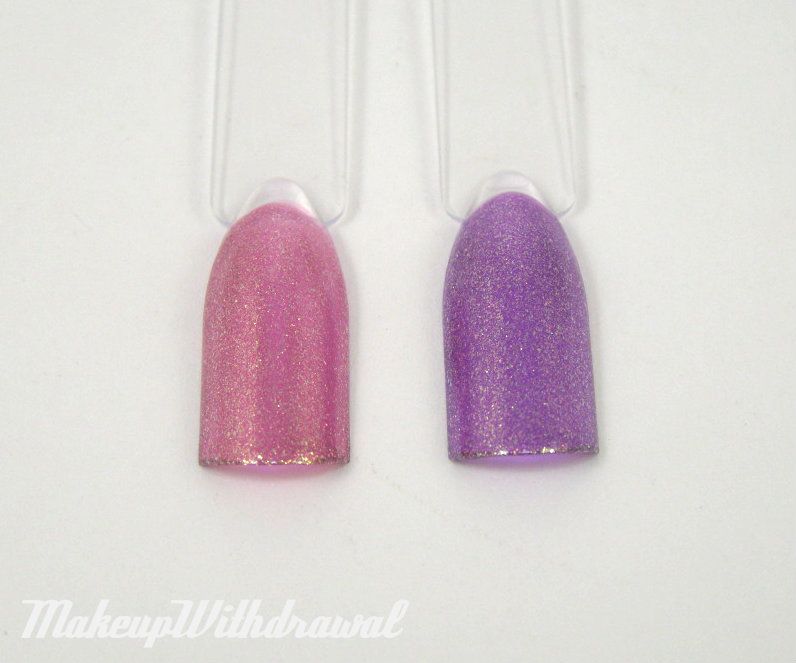


From left to right:
Pandora (II) is a sheer icing white shimmer.
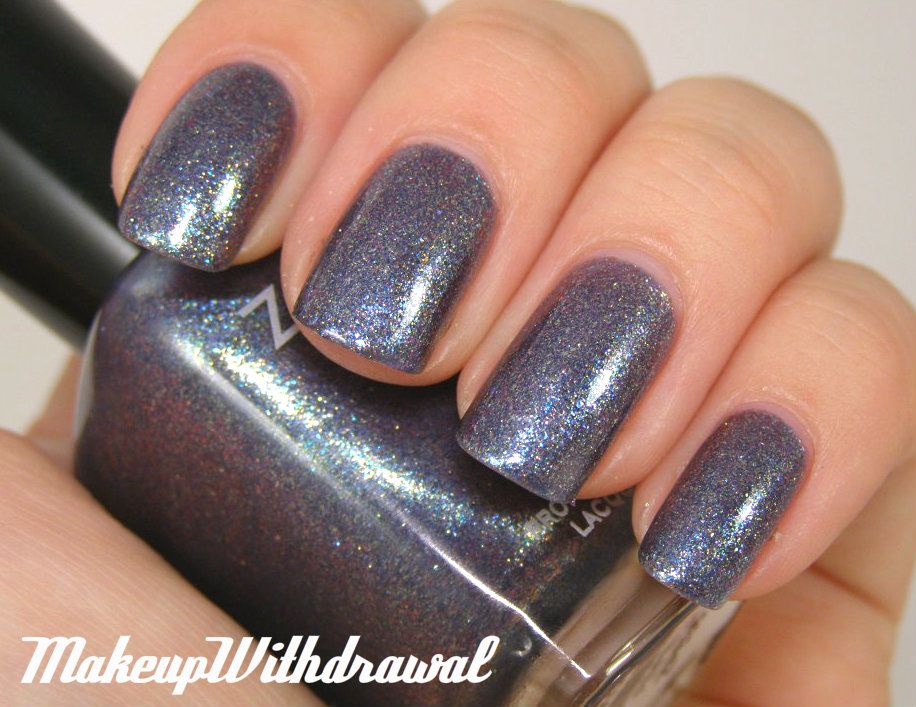
Jolie Poupee (II) is a soft periwinkle matte.
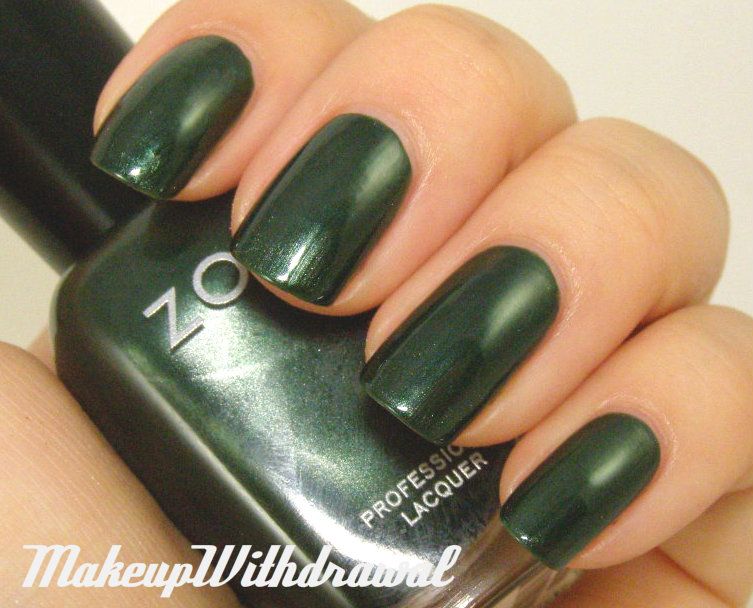
Rated R (II) is a bright lime green-yellow shimmer (this does not photograph very shimmer both in the pan and in swatches but is quite evident in real life).
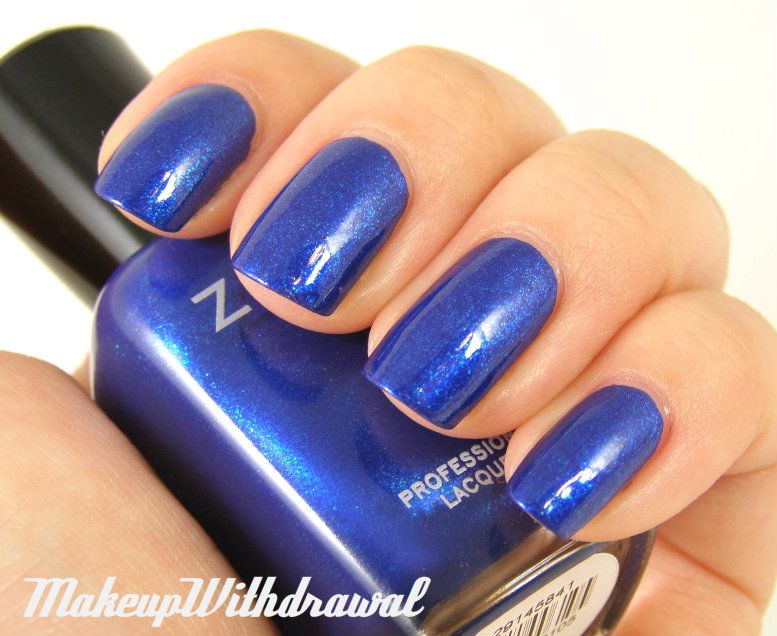
Outremer is a vivid ultramarine blue matte.
Pandora (II) is a matte black.
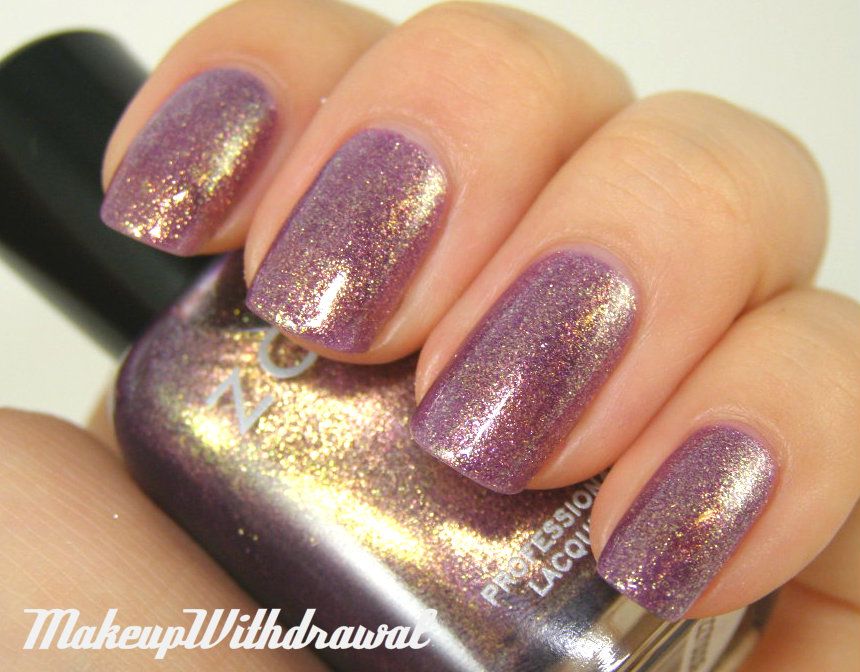
Daphne is a deep matte purple that is quite balanced, leaning neither red nor blue.

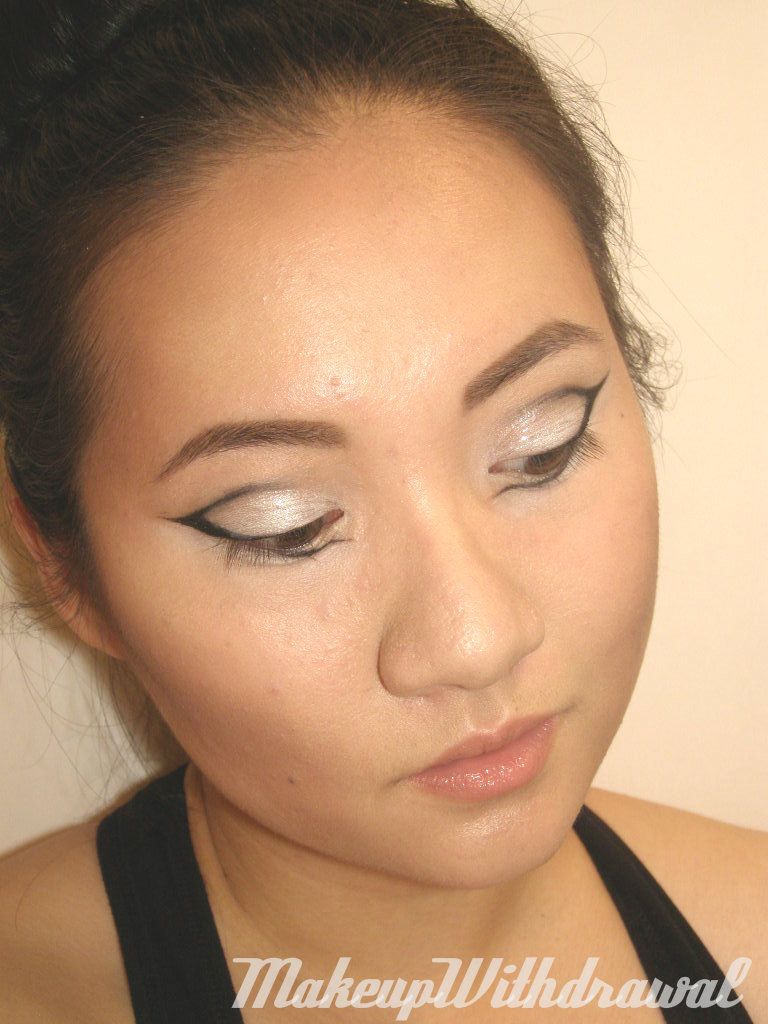
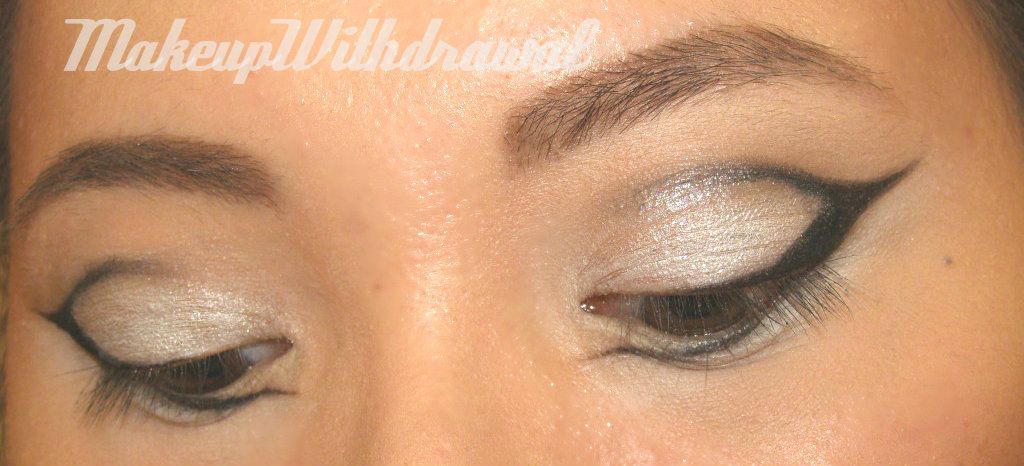
Based on my previous experience with NARS shadows, I can tell you that the mattes are what I like to call high maintenance. To get the maximum color intensity and performance, not any old primer will do. Over my e.l.f. Eyelid Primer, they perform horribly- patchy with little to no color pay off. Over my LORAC Behind The Scenes Primer, they look fantastic. The key is to use a great primer and to use MUCH MORE than you usually would- a thick coat of primer. Also, apply your shadows while it is still a little damp on your lids, using a patting/pressing motion rather than sweeping. 


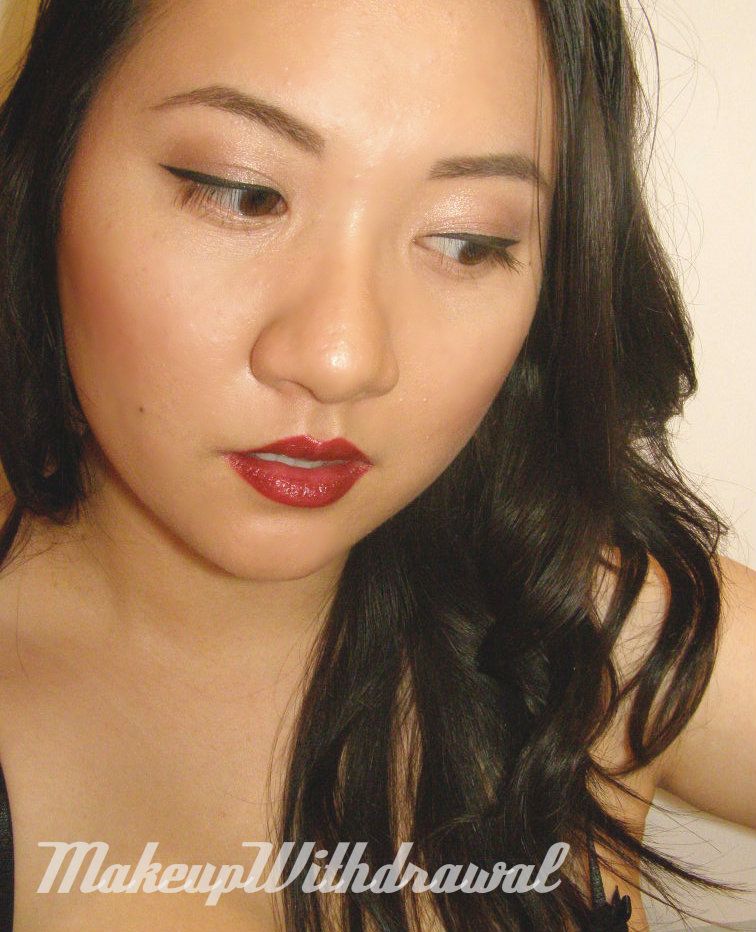
Pandora (II) is rather sheer, but I don't mind it because it is much better as a inner highlight or brow highlight than it is a main lid color. The sheerness keeps it from looking frosty. The matte black Pandora (II) is really handy as a liner- talk about an all in one palette! Highlight, liner, vivid colors that blow my mind.

Where to buy this palette: This palette is $55 has sold out pretty quickly at many locations. Currently, it is not available online at the Nordstrom website any more BUT I have good news. I talked to the NARS counter manager, Tara Stugelmeyer at the Mall of America today and she has a few left. If you call her at 952-883-2121 (Extension 1427), you can still get your hands on one AND get free shipping on it. Even better, with Nordstrom's Anniversary sale going on, there's a GWP. If you spend $150, you get a free NARS lip palette with six shades!

Products featured were purchased by me, for my own use. For additional information, please refer to my Disclosure Policy. 

Wednesday's FOTD

Friday, July 27, 2012

Today's one of those days where I planned to post about something else... but wasn't happy with the pictures. So you get an old FOTD. I'd be ashamed but... honestly, I have a feeling other bloggers do it too.

Brows: NARS Bali shadow, NYX Brow Shaper
Face: Giorgio Armani Luminous Silk mixed with MUFE HD, MUFE Full Cover Concealer, VOV Color Song Volume Blusher #3 Pink Red Mixing, Guerlain Emilio Pucci Meteorites
Eyes: e.l.f. Eyelid Primer, MAC Style Snob, Urban Decay Perversion shadow, La Femme Eyeliner Sealer
Lips: Rimmel Hype mixed with Rock & Republic Cougar gloss


Ok, now I feel properly ashamed. Good content soon to follow, I promise.

Franken: Pillow Mint

Thursday, July 26, 2012

A long time ago, in a galaxy far away there was a polish made by CoverGirl Nail Slicks called Chocolate Mint. It was gorgeous (click here to see what it looks like on Chloe's Nails), a warm brown with green shimmer that looked almost like a duochrome. In fact, it reminds a lot of MAC Green Brown pigment or Club shadow. Now surely you must know by now how much I adore colors like that (ok, if you don't I can sum it up in one word: obsessed) so I was immediately drawn to that polish.


That was two years ago. Cover Slicks were turning up in Dollar Stores so I held out. I waited. Then I had the chance to buy it on eBay for a mere five dollars or so, but declined because I was on one of those DREADFUL NO-BUYS. More often than not, I'm on a no-buy. Story of my life. Since then, I haven't seen a bottle of Chocolate Mint on eBay for any price. Rats.


Enter, franken. Pillow Mint. I think I've captured the essence of the polish pretty well. Perhaps the green shimmer could be larger in particle size, so that it looks like shimmer that changes color rather than greenish frost. I'll work on that. But on the whole, I am thoroughly satisfied with myself. Curing a lemming that spanned years, making it myself and not paying ridiculous prices on eBay? Winning.

Products featured were purchased or created by me for my own use. For additional information, please refer to my Disclosure Policy.

Stamping Plate Organization

Tuesday, July 24, 2012


Confession: I have a hard time keeping all my nail related things super tidy. For some reason, the makeup and brushes are put away pretty neatly but my desk looks like a forest of polishes, covering every flat surface. I also have so many nail art supplies; literally boxes full of things like striping tape, brushes, rhinestones and the like. SO MUCH STUFF. In an effort to tidy up and to organize things because I'm expecting a long distance move this year, I've been looking into more storage options.
Recently, I saw this really awesome method of storing nail plates over at one of my new favorite blogs- Daily Something. I tackled this little project, but wanted to keep my costs to a minimum.


First I hunted around the house for a three ring hole binder. I also ordered some transparent sheets of baseball card protectors (from Amazon, like these ones here). I bought a 30 pack, but in hindsight I should have gone for the 25 pack or lower because each sheet holds 9 plates and I certainly don't own 270 nail plates (so this little endeavor really could have been even cheaper- the 25 pack is $6 something). Oh well- it was $8.39 with free shipping because of Amazon Prime.

Next, I stopped at my neighborhood Dollar Tree because I knew they had shelf liner. One roll of it was more than enough for all my plates (three sets of Bundle Monster plates, various Konad & Fauxnad plates and more).

I cut the shelf liner into small pieces and placed them in each pocket to provide a secure backing for each plate so that they wouldn't fall out.


I also had a few sheets of those full page transparent protectors to hold my XL and other large plates such as the A series plates. In the future, if I buy more A plates (which are 7cm in diameter, if I recall correctly) I may buy a pack of sheet protectors that divide the page in half.

I love this binder storage idea because it displays each and every plate while protecting them. This is fabulous because some of my fauxnad and the first Bundle Monster series plates have wicked sharp edges. Before, my plates were rattling in a box, and they were scratching each other up and it was annoying picking through the pile to find which one I wanted.

$1 for the roll of shelf liner, $8.39 for the protector sheets, $ Free.99 for the binder because I'm a pack rat who never throws away old notes and school supplies. Less than $10 for a solution for one part of my nail clutter? Brilliant.

How do you store your nail plates and other nail supplies?

Products featured were purchased by me, for my own use. The links in this post are not referral links. For additional information, please refer to my Disclosure Policy. 

Some Sinful Colors Spam, Vol. I

Sunday, July 22, 2012

It's $.99 Sinful Colors time at Walgreens again! I of course, picked up a few (right after moaning about how I fail at no-buys yesterday, heh). Here's some swatches of some Sinful Colors polishes, some that I bought today and some that I had already. I know some of these polishes are LE or discontinued, but you'd be surprised at what you might find. I found the discontinued  *edit: it has been brought to my attention that though this shade may not be carried at Walgreens anymore, it may be found in other drugstores in some parts of the country* UFO hiding behind other polishes at a location in  Sacramento. Due to how many swatches I did, these are NOT the best condition my cuticles have ever been in, sorry!


Hazard is a light orange-peach with fine silver shimmer. You can sort of see the shimmer in the bottle, but once on the nail it looks like a creme. Very bright and punchy color. 


UFO is a mix of small round opalescent glitter and micro orange glitter in a sheer orange base. Worn here over Hazard. I love this, it is such a good layering glitter. 


Slate is lighter grey with silver shimmer. 


Mint Apple is a crowd favorite. Light jade green with sparkles that look predominately silver. I don't love the formula though, hard for me to work with.


Leap Flog (... leap flog? Whhhuuuuuut?) is a new color, from a seasonal display. It reminds me a lot of Zoya's Evvie from their Fall Designer Collection. I love this shade, a green-grey creme. It's precisely the shade that I want to see lots of this fall. 


Island Coral is a bright salmon. I had to get this shade after seeing this post on Gnarly Gnails, comparing it to butter London's Trout Pout. More pink than Hazard, creme finish.


Citrine is another shade that was in a LE display. A bright, attention getting orange that leans very red, creme in finish but with a certain amount of squishiness to it. It looks neon in the bottle, but dries more red and a bit darker, I find.


Winterberry is a somber ashy purple with various colored shimmer that looks predominately purple. I had seen it featured on a lot of blogs but hadn't understood the fuss until I actually wore it. Yeah. It's wicked cool. 


Rain Storm is a denim blue creme. Echos Zoya Natty, but more blue and more vivid. 


Hottie is a blue version of UFO. Small round and micro opalescent sheer glitter in a sheer blue base. Pictured here over Rain Storm. 


I really like Sinful Colors polishes. They have a lot of very interesting colors, and on the whole have pretty decent formulas. I like that they are always coming out with new and fascinating colors, and what's more- these shades are always on trend. Oh and the sale price of $.99 with a regular price of $1.99? Suck it, high end polishes. 


Hopefully these swatches help you decide which ones you'll be picking up!

Orly Buried Alive (Also How I'm Failing at a No-Buy)

Saturday, July 21, 2012

So I failed a little bit a lot at my no-buy yesterday. I went to Sally Beauty Supply that was having an additional 50% off their clearance. I bought a couple Orly polishes as well as China Glaze Hook and Line. This is one of the Orly polishes that I bought- Buried Alive from the Dark Shadows collection.


This was the only one from Dark Shadows that I was interested in. A warm brown with various colored shimmer that is predominately gold/bronze shown here in three coats. I absolutely love it, I had actually wanted to buy it when it was full priced. I guess that's the only good thing that came out of destroying my no-buy, at least I bought something that I had really wanted instead of mindlessly purchasing for the sake of acquiring polish!

Oh but wait, that's not all the damage I did. I also stopped at TJ Maxx where I saw Essie polishes for $3.99 and I bought two. Also, I picked up a set of Barielle treatments- a bottle of Nail Building Protein and Ultra Speed Dry Manicure Extender. I'm not too mad at myself about the Barielle treatments because I've used them before and they're really wonderful, and well worth the price that I found them for at TJ Maxx.

But wait, that's not all. I also ordered two polishes from a-england, Tristam and Lady of the Lake. I swear I'm not rationalizing this purchase but I had been waiting for a sale like this since February. I was so impressed with Dragon and Saint George that I swore I'd buy Tristam and Lady of the Lake as well as any holos from the Legend collection if I ever found a good deal.

Damage done? $38 for Orly Dayglow (I needed a white), Orly Buried Alive, China Glaze Hook and Line, Essie Luxedo, Essie Exotic Liras, Barielle Ultra Speedy Dry Manicure Extender, Barielle Nail Building Protein and finally a-england Tristam and Lady of the Lake. At least they were on sale, right?

*shuffles off* I swear I'll be good from here on out.


Products featured were purchased by me, for my own use. For additional information, please refer to my Disclosure Policy.

Eyeliner Sandwich Technique

Friday, July 20, 2012

Come on, this post's title involves the word sandwich. How could you not want to know more?

It's been ridiculously hot this summer in Minnesota, with temperatures in the 90s and uncomfortable humidity. My skin has been super oily and sweaty, meaning that my eye makeup pretty much melted off each day. While searching for a way to make my liner stay, I discovered a way to also really make the colors pop.

I own a few liners that are sort of sheer. Interesting colors, but not very good payoff. You know when you line your eyes over and over again with the pencil, and even after layer after layer it still looks rather weak? So, the eyeliner sandwich was born.

After applying my eyelid primer (I use either LORAC Behind the Scenes Eye Primer or e.l.f. Eyelid Primer if I'm only doing a wash of color) and apply my shadows, I start with one layer of eyeliner. I then take a black shadow (I've been working with matte ones like Calvin Klein Night Dusk or Rock & Republic Fatalistic) and a small brush (I prefer angular) and apply it on top, firmly patting it into the shadow. Then, apply the eyeliner again on top.

Here, I've used L'Oreal HiP Cream Crayon in Intricate sandwiched with Urban Decay Perversion shadow.


I've been really thrilled with the results. Colors that were just 'meh' on their own now have really great color payoff. Vibrant jewel tones that I've wanted all along. This has let me rediscover some products that I've literally left sitting untouched in my stash for forever (like that Shu Uemura Drawing Pencil and that L'Oreal HiP Cream Crayon) just because the color was so sheer and hard to work with. These swiggles on the left are of the liner by itself, the right patch is after it has been layered with black shadow. Best of all, my eyeliner has been lasting all day even through the heat.

Have you tried something like this before? I know that some people use black shadow on top of their liner to set it.

Some of the products in this post were given to me as a gift by family and friends. The rest I purchased for my own use. For additional information, please refer to my Disclosure Policy. 

The Dark Knight Rises (Tonight)

Thursday, July 19, 2012

I'm going to go see The Dark Knight Rises in a few hours at the midnight premiere. I am really excited! I of course, had to paint my nails in accordance with my plans. I believe that these are a little more true to the comic.

I used Zoya Rehka* as the red base, then sponged a gradient with Wet'n'Wild Black Creme in a circular gradient instead of down the nail. I then used the two Bundle Monster plates from the first and second series (can't recall the plate numbers at the moment, sorry! A friend has those plates) with the bat images to stamp them randomly with Konad Black Special Polish.  Then, I applied a matte coat (OCC Flatline) and FINALLY (good grief, did I have enough steps?) I use a glossy top coat on top of just the bats to accent them. On my middle accent finger, I hand drew Batman (he's supposed to be swooshing the cape over his shoulder, my mother said he looks like a cat) with Zoya Rehka, Wet'n'Wild Black Creme and Konad White Special Polish.

Anyone else going to go see The Dark Knight Rises?

*indicates a product that was sent to me for review. For additional information, please refer to my Disclosure Policy.

Zoya Fall 2012 Diva Collection

Tuesday, July 17, 2012

This is probably the collection that many of you were looking forward to the most. I mean, can you argue with sparkle? Zoya's fall Diva collections takes rich jewel colors and adds the most wonderful light-catching sparkles. My inner magpie approves. Let's take a look at the six shades!


Elisa is a primary red metallic polish. Strangely enough, I discovered while looking for other polishes to compare it to, I don't own any other metallic reds. Two coats.


Suri is a rich purple metallic with very fine red and blue sparkle. Two coats.


Song is a bold blue with different sized sparkle. The bigger sparkle looked somewhat silvery to me in the bottle, but because of the blue base they just sparkle blue. I also see the tiniest hint of ultra fine purple shimmery sparkle. Two coats.


Ray is so unbelievably gorgeous, a dark ivy metallic green with a touch of silvery frost. I love how it looks on my nails, very few greens are flattering on me (but I love them anyways). Two coats.


Feifei ... there's a lot going on with Feifei. I think I could stare at this polish all day and not see everything. For starters it is in a smokey blue base with golden bronze large particle sparkle, then also blue large particle shimmer, then finally specks of purple too. So much to behold! Three coats.


Daul is a translucent violet with heaps of large chunky gold sparkle. Three coats. Immediately, I was reminded of Zoya Faye but when I put them next to each other, they are quite different. Take a look:

Faye on the left, Daul on the right. Both at three coats. As you can see Faye is much more mauve in comparison while Daul is cooler, being violet.


What I like about this Diva set is that all the colors have slightly different finishes. The metallics are not too frosty (which would have me running for the hills) but add subtle fine sparkle that does not reveal brush strokes. My favorites are Ray which I was not expecting to love because I don't usually love metallics at all. Also, I absolutely love Daul (having already loved Faye, it was not a difficult leap). I want to like Feifei but there is just so much going on, that it looks "busy" to me. I know that some of you will love how crazy sparkly it is though!

The formulas on these were great, I'm honestly hard pressed to come up with a single Zoya polish that I don't like the formula on. Most of the polishes were opaque in two coats, but the super sparkle ones- Feifei
and Daul needed three.

Zoya polishes are free of formaldehyde, toluene, dibutyl phthalate (DBP) and camphor.The Diva Collection is available now on Zoya.com for $8 each.

Which one is your favorite? Or do you have need-them-all-itis yet?

Products featured were sent to me for review, either by the manufacturer or a PR company representing the brand. For additional information, please refer to my Disclosure Policy.